Securing access to resources and protecting user data are essential in modern web applications. The Microsoft Authentication Library (MSAL) offers a robust solution for integrating Microsoft Entra authentication seamlessly into Vue.js applications.
In this blog, we’ll walk through the process of implementing MSAL into SPA using Vue 3 and .NET 8 API.
Before diving in, confirm you have the following prerequisites set up:
- Node.js and npm: Verify that Node.js and npm are installed on your system.
- Vue CLI: Install the Vue CLI to scaffold and handle Vue projects.
- Azure AD Registration: Prior to utilizing @azure/msal-browser, register a Single Page Application in Azure AD. This step is essential for obtaining a valid clientId for configuration and registering the routes that your application will accept redirect traffic on.
Process of Implementing MSAL into SPA using Vue 3 and .NET 8 API
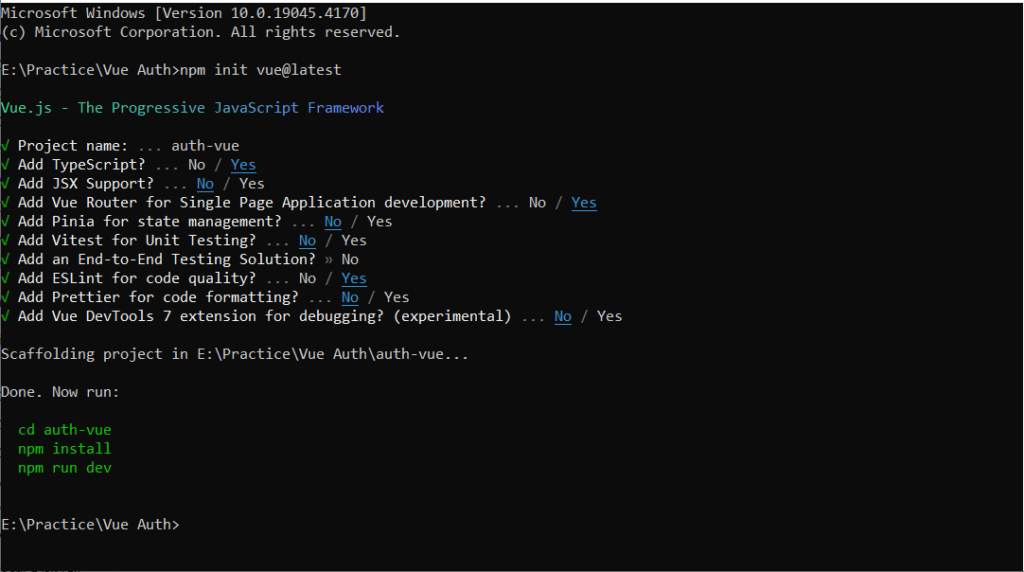
Setting up a Vue 3 Project
Let’s start by creating a new Vue 3 project using the Vue CLI:
Installing MSAL:
Next, we need to install the axios & MSAL library:
					npm i @azure/msal-browser
npm i axios
Configuring MSA:
Create a new file named `authConfig.ts` in the `src/config` directory to store MSAL configuration:
					import { type AccountInfo, PublicClientApplication } from "@azure/msal-browser"
import { reactive } from "vue"


export const msalConfig = {
    auth: {
        clientId: 'YOUR_CLIENT_ID',
        authority: 'https://login.microsoftonline.com/YOUR_TENANT_ID',
        redirectUri: 'http://localhost:8080/',
        postLogoutUri: 'http://localhost:8080/'
    },
    cache: {
        cacheLocation: 'localStorage',
        storeAuthStateInCookie: false
    }
}


export const graphScopes = {
    scopes: ['api://YOUR_CLIENT_ID/access_as_user']
}
export const state = reactive({
    isAuthenticated: false,
    user: null as AccountInfo | null
})
export const msalObj = new PublicClientApplication(msalConfig);
Replace `YOUR_CLIENT_ID` and `YOUR_TENANT_ID` with your Azure AD application’s client ID and tenant ID.
Creating the Authentication Methods:
Now, let’s create a method to handle authentication using MSAL. Create a file named `useAuth.ts` in the `src/config` directory:
					import { ref } from 'vue'
import { msalObj, state, graphScopes } from './msalConfig'


export function useAuth() {
    const isAuthenticated = ref(false)


    const login = async () => {
        try {
            if (!msalObj) {
                throw new Error('MSAL not initialized. Call initializeMSAL() before using MSAL API')
            }
            await msalObj.loginRedirect()
            isAuthenticated.value = true;


            const loginResponse = await msalObj.loginRedirect();
            isAuthenticated.value = true;


            console.log('Login success: ', loginResponse);
        } catch (error) {
            console.error('Login error: ', error);
        }
    }


    const logout = () => {
        if (!msalObj) {
            throw new Error('MSAL not initialized. Call initializeMSAL() before using MSAL API')
        }


        msalObj.logoutRedirect({
            onRedirectNavigate: (url) => {
                // Return false if you would like to stop navigation after local logout
                return false;
            }
        });

        isAuthenticated.value = false;
        window.location.reload();
        console.log('Logged out');
    }


    const handleRedirect = async () => {
        try {
            await msalObj.handleRedirectPromise();
            state.isAuthenticated = msalObj.getAllAccounts().length > 0;
            state.user = msalObj.getAllAccounts()[0];

        } catch (error) {
            console.error('Redirect error: ', error);
        }
    }


    const getAccessToken = async () => {
        try {
            const accounts = msalObj.getAllAccounts();
            if (accounts.length >= 1) {
                const account = { account: accounts[0] }
                const request = Object.assign(graphScopes, account);
                const tokenResponse = await msalObj.acquireTokenSilent(request);
                return tokenResponse.accessToken;
            }
            return null;
        } catch (error) {
            logout();


        }
    }


    return { isAuthenticated, login, logout, handleRedirect,getAccessToken };
}
Creating the Authentication Methods:
Let’s integrate the authentication methods into a component. Modify the `App.vue` file as follows:
<script setup lang="ts">
import { onMounted } from 'vue';
import { useAuth } from './config/useAuth';
import { msalObj, state } from './config/authConfig';
import axios from 'axios';


const { login, logout, handleRedirect, getAccessToken } = useAuth();


const getToken = async () => {
  const token = await getAccessToken();
  console.log(token);
}


const callAPI = async () => {
  const token = await getAccessToken();
  const config = {
    headers: { Authorization: `Bearer ${token}` }
  };
  axios.get('https://localhost:7081/Department/GetAll', config)
    .then((response: any) => {
      console.log(response.data)
      alert('Success')
    }).catch((error: any) => {


      console.error('Api call error:', error)
      alert('Api call error')
    })
}
const handleLogin = async () => {
  await login();
}
const handleLogout = async () => {
  await logout();
}


const initialize = async () => {
  try {
    await msalObj.initialize();
  } catch (error) {
    console.error('Initialization error: ', error);
  }
}
onMounted(async () => {
  await initialize();
  await handleRedirect();
})
</script>


<template>
  <div class="wrapper" style="display: flex; justify-content: center; align-items: center; height: 100vh;">
    <div style="text-align: center;">
      <div v-if="state.isAuthenticated">
        <div>Welcome {{ state.user?.name }}!</div>
        <button
          style="margin: 10px; padding: 8px 16px; background-color: #007bff; color: #fff; border: none; border-radius: 4px; cursor: pointer;"
          @click="handleLogout">Log Out</button>
      </div>
      <div v-else>
        <button
          style="margin: 10px; padding: 8px 16px; background-color: #007bff; color: #fff; border: none; border-radius: 4px; cursor: pointer;"
          @click="handleLogin">Log in</button>
      </div>
      <div>
        <br />
        <button
          style="margin: 10px; padding: 8px 16px; background-color: #007bff; color: #fff; border: none; border-radius: 4px; cursor: pointer;"
          @click="callAPI">Call API</button>
      </div>
    </div>
  </div>
</template>


<style scoped></style>
Replace `YOUR_CLIENT_ID` and `YOUR_TENANT_ID` with your Azure AD application’s client ID and tenant ID.
Azure Ad configuration on .NET 8 API appsettings.json:
					"AzureAd": {
    "Instance": "https://login.microsoftonline.com/",
    "TenantId": "YOUR_TENANT_ID",
    "ClientId": "YOUR_CLIENT_ID",
    "Authority": "https://login.microsoftonline.com/YOUR_TENANT_ID/",
    "Issuer": "https://login.microsoftonline.com/YOUR_TENANT_ID/v2.0",
    "Audience": "YOUR_CLIENT_ID",
  }
Replace `YOUR_CLIENT_ID` and `YOUR_TENANT_ID` with your Azure AD application’s client ID and tenant ID.
Install the NuGet packages:
- Microsoft.AspNetCore.Authentication.JwtBearer;
- Microsoft.Identity.Web;
Register the authentication services:
This configuration sets up the default authentication scheme to use JWT Bearer authentication and adds Microsoft Identity Web API authentication with options bound from the “AzureAd” configuration section.
					builder.Services.AddAuthentication(authOptions =>
{
    authOptions.DefaultAuthenticateScheme = JwtBearerDefaults.AuthenticationScheme;
}).
AddMicrosoftIdentityWebApi(options =>
{
    builder.Configuration.Bind("AzureAd", options);


    options.TokenValidationParameters.NameClaimType = ClaimTypes.Email;
}, options => { builder.Configuration.Bind("AzureAd", options); });
Configure the middleware:
To add the authentication and authorization middleware to the middleware pipeline, add a call to the UseAuthentication and UseAuthorization methods in your Program.cs file:
					app.UseAuthentication();
app.UseAuthorization();
Protect API Endpoints:
To secure an endpoint, you need to add the [Authorize] attribute to your controller action:
					[HttpGet]
[Authorize]
public async Task<IActionResult> GetAll([FromQuery] GetAllDepartmentQuery query)
{
   var user = User.Identity.Name;
   var result = await _mediator.Send(query);
   return Ok(result);
}
If you’re having trouble getting Microsoft Entra Auth to work smoothly with Vue 3 & .NET 8, we’ve got your back! Our Vivasoft team of .NET experts knows their way around Vue 3 and .NET 8, making the setup process a breeze.
We’ll help you make your authentication system better and safer without any fuss.
Let’s talk about your project needs today, and we’ll get things sorted together!