Are you ready to dive into the world of OAuth 2.0 and learn how to access Google Drive resources using .NET?
In this guide, we’ll explore the inner workings of OAuth 2.0 and demonstrate how to list Google Drive files. We’ll even simulate this entire process using ASP.NET without relying on any external libraries.
What do we want to do?
- Understand how OAuth 2.0 works and its working principles
- List google drive files
- Simulate the process with ASP.NET without any library.
What is OAuth 2.0?
The OAuth 2.0 is an authorization framework. It is a protocol that allows a user to grant a third-party web site or application access to the user’s protected resources, without necessarily revealing their credentials or identity.
We will follow these steps strictly and list the files of users google drive.
Step By Step Guide to OAuth 2.0 & Google Drive Resource Access With .Net
Step 1: Register Your App in the Auth Provider
Create a google cloud project. Go to https://console.cloud.google.com/.
Step 2: Enable the Google Drive Api
Step 3: Configure oauth-consent Screen
Provide Basic Information

Define Scopes

Add Test Users
Only users who can test this application

Step 4: Create Access Credentials
- Click on the Credentials menu in the left of the consent screen.
- Click on the create credentials button.
- Then select the OAuth Client Id option.
- Select Web Application as application type.
- Click ADD URI in the Authorized redirect URIs section and paste your callback endpoint url and click Create button.
- Then client Id and secret will be created.
Create & Provided Callback url
Click on create & make sure you provided the callback url

Copy and Store Client ID
Copy the created client id and secret and store it. We will use them from backend code.

Our prerequisites are done. Now we can go for code.
Step 1: First create a .Net MVC project.
Step 2: Create a class that will hold our constant data.
					public class AppConstantDataProvider
{
    public readonly string AuthUrl = "https://accounts.google.com/o/oauth2/v2/auth/oauthchooseaccount";
    public readonly string TokenUrl = "https://oauth2.googleapis.com/token";
    public readonly string DriveFileUrl = "https://www.googleapis.com/drive/v3/files";
    public readonly string ClientId = "Your-client-id";
    public readonly string ClientSecret = "Your-client-secret";
    public readonly string RedirectUri = "https://localhost:7220/Home/Callback";
    public readonly string AccessScopes = "https://www.googleapis.com/auth/drive.file https://www.googleapis.com/auth/drive";

    public void SetTokenResponse(TokenResponse tokenResponse)
    {
        GoogleTokenResponse = tokenResponse;
    }

    public TokenResponse GoogleTokenResponse { get; set; }
}
Step 3: Create another class that will help us build encoded uri.
					public class EncodedUrlBuilder(string baseUrl)
{
    private Dictionary<string, string> Params = [];

    public EncodedUrlBuilder AddParam(string key, string value)
    {
        Params.Add(key, value);
        return this;
    }

    public string Build()
    {
        var encodedKeyValuePairs = new List<string>();
        foreach (var kvp in Params)
        {
            encodedKeyValuePairs.Add($"{HttpUtility.UrlEncode(kvp.Key)}={HttpUtility.UrlEncode(kvp.Value)}");
        }

        var queryString = string.Join("&", encodedKeyValuePairs);
        return baseUrl + "?" + queryString;
    }
}
Step 4: Add classes below.
					public class TokenResponse
{
    [JsonProperty("access_token")]
    public string AccessToken { get; set; }

    [JsonProperty("token_type")]
    public string TokenType { get; set; }

    [JsonProperty("expires_in")]
    public long? ExpiresInSeconds { get; set; }

    [JsonProperty("refresh_token")]
    public string RefreshToken { get; set; }

    [JsonProperty("scope")]
    public string Scope { get; set; }

    [JsonProperty("id_token")]
    public string IdToken { get; set; }
}

public class DriveFileResponse
{
    public string NextPageToken { get; set; }
    public string Kind { get; set; }
    public bool IncompleteSearch { get; set; }
    public List<FileInfoResponse> Files { get; set; }
}

public class FileInfoResponse
{
    public string Kind { get; set; }
    public string MimeType { get; set; }
    public string Id { get; set; }
    public string Name { get; set; }
}

public class OAuthViewModel
{
    public string ConcentUrl { get; set; } = string.Empty;
}
Step 5: We will build the consent url from backend code and send it to view. Create an endpoint that exactly matches the callback url specified previously. Create an endpoint that will help listing our google drive files. Here is the code of HomeController.
					public class HomeController : Controller
{
    private readonly ILogger<HomeController> _logger;
    private readonly AppConstantDataProvider _dataProvider;

    public HomeController(ILogger<HomeController> logger, AppConstantDataProvider dataProvider)
    {
        _logger = logger;
        _dataProvider = dataProvider;
    }

    public IActionResult Index()
    {
        string concentUrl = new EncodedUrlBuilder(_dataProvider.AuthUrl)
            .AddParam("redirect_uri", _dataProvider.RedirectUri)
            .AddParam("prompt", "consent")
            .AddParam("response_type", "code")
            .AddParam("client_id", _dataProvider.ClientId)
            .AddParam("scope", _dataProvider.AccessScopes)
            .AddParam("access_type", "offline")
            .AddParam("service", "lso")
            .AddParam("o2v", "2")
            .AddParam("theme", "mn")
            .AddParam("ddm", "0")
            .AddParam("flowName", "GeneralOAuthFlow")
            .Build();

        return View(new OAuthViewModel { ConcentUrl = concentUrl });
    }

    public async Task<IActionResult> Callback(string code)
    {
        var tokenRequest = new FormUrlEncodedContent(
        [
            new KeyValuePair<string, string>("client_id", _dataProvider.ClientId),
            new KeyValuePair<string, string>("client_secret", _dataProvider.ClientSecret),
            new KeyValuePair<string, string>("redirect_uri", _dataProvider.RedirectUri),
            new KeyValuePair<string, string>("code", code),
            new KeyValuePair<string, string>("grant_type", "authorization_code")
        ]);

        using var httpClient = new HttpClient();
        var tokenResponse = await httpClient.PostAsync(_dataProvider.TokenUrl, tokenRequest);
        tokenResponse.EnsureSuccessStatusCode();

        var responseContent = await tokenResponse.Content.ReadAsStringAsync();
        var response = Newtonsoft.Json.JsonConvert.DeserializeObject<TokenResponse>(responseContent);
        _dataProvider.SetTokenResponse(response);

        return RedirectToAction(nameof(List), "Home");
    }

    public async Task<IActionResult> List()
    {
        using var httpClient = new HttpClient();
        httpClient.DefaultRequestHeaders.Add("Authorization", $"Bearer {_dataProvider.GoogleTokenResponse?.AccessToken}");

        var responseMessage = await httpClient.GetAsync(_dataProvider.DriveFileUrl);
        var stringContent = await responseMessage.Content.ReadAsStringAsync();
        var data = Newtonsoft.Json.JsonConvert.DeserializeObject<DriveFileResponse>(stringContent);

        return View(data);
    }
}
Step 6: Replace the index.cshtml file content with below code.
					@model OAuthViewModel
<div class="container">
    <h2>Google drive file listing with OAuth 2.0</h2>
    <button class="btn btn-primary" onclick="googleConcent()">Login with Google</button>
</div>
<script type="text/javascript">
    const googleConcent = () => {
        window.location.href = `@Html.Raw(Model.ConcentUrl)`;
    }
</script>
The view will look like below.

We need to add another view to list the files named List.cshtml.
					@model DriveFileResponse
<div class="container">
    <h2>Drive Files</h2>
    <table class="table table-striped table-bordered">
        <thead>
            <tr>
                <th>Name</th>
                <th>MIME Type</th>
                <th>ID</th>
            </tr>
        </thead>
        <tbody>
            @foreach (var file in Model.Files)
            {
                <tr>
                    <td>@file.Name</td>
                    <td>@file.MimeType</td>
                    <td>@file.Id</td>
                </tr>
            }
        </tbody>
    </table>
</div>
Coding part is completed. Now let’s test the project.
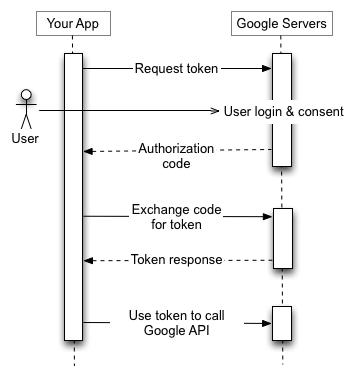
- Click on the Login with Google button.
- This will redirect you to the account choosing page. Choose the google account you wish to list files of. Remember this account must be one of the accounts you set for testing while google cloud project setup.
- A user consent page will be displayed like below. This is the page that will ask you to grant access to certain resources of your google drive to the Application.

- If you click Allow, google will call the callback endpoint defined in HomeController with a code. Using this code along with the client secret and other options the applicaton made another POST request. As a result it gets back the access token.
- Now the application uses this access token and makes requests for drive files and gets the desired google drive files data and displays in a table like below.

Struggling with your .NET Core project? We’ve got you covered. Hire dedicated .NET developers from Vivasoft.
Our experts deliver high-quality, efficient solutions for your project’s needs.
Contact us today to discuss your requirements and let us provide the best support for your project.